BLOGGER sudah menyiapkan widget "Formulir Kontak" untuk dipasang di sidebar blog.
Widget contact form ini memudahkan pengunjung menghubungi admin blogger untuk "kepentingan pribadi" atau "pesan khusus" yang tidak ingin diketahui pengunjung lain.
Dengan adanya halaman khusus Form Kontak ini, maka pengunjung/pembaca tidak mesti mengirimkan pesan via email, cukup di contact form ini. What a User Friendly!
Berikut ini CB share cara membuat halaman khusus (halaman statis) formulir kontak sehingga Contact Form tidak muncul di sidebar.
Contoh atau demo halaman kontak di blogger ini bisa dilihat di Halaman Kontak.
Jika ada pengunjung yang mengisi contact form tersebut, maka pesannya akan masuk ke Inbox Email Gmail kita sebagai admin blog, yaitu email yang digunakan untuk membuat blog.
Jika tidak ada di folder email utama (Primary), maka akan masuk di folder "Social".
Cara Membuat Formulir Kontak (Contact Form) di Halaman Statis Blog
Berikut ini cara membuat formulir kontak di halaman statis yang dishare Sneet.Tahap #1: Tambahkan Gadget Contact Form
1. Klik Layout > Add a Gadget > Klik More Gadgets > pilih "Contact Form".
2. Klik Save!
3. Seret dan pindahkan posisi widget Contact Form tadi ke bawah elemen "Blog Posts"
4. Klik Save arrangement!
Tahap #2: Sembunyikan Widget "Contact Form"
1. Template > Edit HTML
2. Copas kode berikut ini di atas kode ]]></b:skin>
.widget.ContactForm { display: none; }
Tahap #3: Membuat Halaman Kontak
1. Page > New Page
2. Isi judul dengan, misalnya, Kontak
3. Klik mode HTML
4. Copas kode berikut ini di kolom content:
<style type="text/css">
.widget.ContactForm { display: block; }
.post-footer { display: none; }
#blog-pager { display: none; }
.blog-feeds { display: none; }
.widget.ContactForm .title { display: none; }
.widget.ContactForm * { max-width: 100%; }
</style>
.widget.ContactForm { display: block; }
.post-footer { display: none; }
#blog-pager { display: none; }
.blog-feeds { display: none; }
.widget.ContactForm .title { display: none; }
.widget.ContactForm * { max-width: 100%; }
</style>
5. Klik Publish !
Kini halaman kontak sudah ada di blog Anda. Yang di atas adalah tampilan simple atau sederhana, seperti pada gambar di atas.
Tampilan Form Kontak Lainnya
Berikut ini kode dan tampilan halaman kontak dari widget contact form lainnya --ini yang digunakan CB-- dari Kang Ismet.Tahapannya membuat halaman kontaknya seperti cara di atas:
1. Layout > Add a Widget > Contact Form
2. Page > New Page > Isi judul dengan Kontak
3. Klik mode HTML dan copas kode ini:
<form name="contact-form">
<p></p>
Nama
<input id="ContactForm1_contact-form-name" name="name" size="30" type="text" value="" />
<p></p>
Alamat Email <span style="color: red; font-weight: bolder;">*</span>
<p></p>
<input id="ContactForm1_contact-form-email" name="email" size="30" type="text" value="" />
<p></p>
Isi Pesan <span style="color: red; font-weight: bolder;">*</span>
<textarea cols="25" id="ContactForm1_contact-form-email-message" name="email-message" rows="5"></textarea>
<p></p>
<input id="ContactForm1_contact-form-submit" type="button" value="Kirim" />
<div style="max-width: 222px; text-align: center; width: 100%;">
<div id="ContactForm1_contact-form-error-message">
</div>
<div id="ContactForm1_contact-form-success-message">
</div>
</div>
</form>
<style type="text/css">
/* Menyembunyikan elemen dalam postingan */
#comments, #blog-pager, .breadcrumbs, .post-footer{display:none}
</style>
<p></p>
Nama
<input id="ContactForm1_contact-form-name" name="name" size="30" type="text" value="" />
<p></p>
Alamat Email <span style="color: red; font-weight: bolder;">*</span>
<p></p>
<input id="ContactForm1_contact-form-email" name="email" size="30" type="text" value="" />
<p></p>
Isi Pesan <span style="color: red; font-weight: bolder;">*</span>
<textarea cols="25" id="ContactForm1_contact-form-email-message" name="email-message" rows="5"></textarea>
<p></p>
<input id="ContactForm1_contact-form-submit" type="button" value="Kirim" />
<div style="max-width: 222px; text-align: center; width: 100%;">
<div id="ContactForm1_contact-form-error-message">
</div>
<div id="ContactForm1_contact-form-success-message">
</div>
</div>
</form>
<style type="text/css">
/* Menyembunyikan elemen dalam postingan */
#comments, #blog-pager, .breadcrumbs, .post-footer{display:none}
</style>
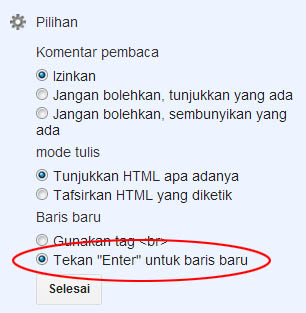
Pada Menu Pilihan, pilih/centang "Enter" untuk baris baru.

Sekarang klik "Template" > "Edit HTML" > Copas kode berikut ini:
/* CSS Contact Form */
#ContactForm1{
display:none;
}
#ContactForm1_contact-form-name, #ContactForm1_contact-form-email{
width: 300px;
height:auto;
margin: 5px auto;
padding: 10px;
background: #f2f2f2;
border: 1px solid #ccc;
color:#777;
}
#ContactForm1_contact-form-name:focus, #ContactForm1_contact-form-email:focus, #ContactForm1_contact-form-email-message:focus{
background: #fffff7;
}
#ContactForm1_contact-form-email-message{
width: 450px;
height: 175px;
margin: 5px auto;
padding: 10px;
background: #f2f2f2;
border: 1px solid #ccc;
color:#777;
font-family:Arial, sans-serif;
}
#ContactForm1_contact-form-submit {
width: 101px;
height: 35px;
float: left;
color: #FFF;
padding: 0;
margin: 10px 0 3px 0 0;
cursor: pointer;
background: #5E768D;
border: 1px solid #556f8c;
border-radius:3px;
}
#ContactForm1_contact-form-submit:hover {
background:#435c74;
}
#ContactForm1_contact-form-error-message, #ContactForm1_contact-form-success-message{
width: 450px;
margin-top:35px;
}
Save Template!
Kini blog Anda sudah punya halaman khusus Kontak berisi Contact Form! Untuk menampilkan di Navigasi Menu, silakan ke tutorial berikut ini: Menampilkan Halaman Statis di Navigasi Menu Blog.
Good Luck & Happy Blogging! (www.contohblog.com).*


0 komentar:
Posting Komentar